Level of Detail (LODs)
General
BEN article 1
First the basics: you can use the ATTR_LOD command in an object to specify what distance range an object is seen from. This has two implications:
-
You can have your object look different (and usually less complex) from farther away.
-
Probably more important is – your object is not drawn from arbitrarily far away. All drawing is bounded!
This second aspect is actually the more important one…because at any given time most of the objects in the sim are too far away to draw due to LOD! But this begs the question: what happens if you don’t specify ATTR_LOD at all? Is your object drawn from hundreds of miles away?
NOTE
if you don’t specify ATTR_LOD X-Plane calculates an LOD for your entire object based on its overall bounding box size, that starts at 0 meters and goes to some distance we think no one would care if your object disappeared.
Our built-in algorithm usually works well most of the time, but there are some cases where it could be fooled, such as if you have two smaller meshes in one OBJ, but very far apart (e.g. two small houses 10 miles apart). This makes the overall bounding box size for the OBJ large.
What this means is: if you have a dozen small taxiway signs from XTaxiMaker, they’ll all disappear relatively quickly as you go away from the airport, protecting framerate (by keeping the number of drawn objects down). If you merge those into one big object, the performance of the sim changes in two ways:
-
Framerate when the objects are drawn goes up – we now draw one object instead of five. The number of objects drawn is very important to framerate.
-
The objects will be drawn more frequently, so overall framerates maybe lower.
The moral of the story is this: if you merge objects for performance, be sure to insert an ATTR_LOD statement that is apporpriate to the actual distance at which point the objects are invisible, not the total “radius” of the object! Taxi way signs are not needed after 1500 meters, even if they cover the whole airport. Similarly some packages have taxiway markings in an OBJ. These objects usually cover big areas but the lines themselves are so thin that they aren’t needed when far away.
(Also beware: LOD is calculated frmo the middle of the object, so if the object is huge, take that into account.) As a final note, ATTR_LOD is “free”. X-Plane will calculate and check LOD distances on every object no matter what. If you don’t use ATTR_LOD, one is generated for you. So there is no harm in adding ATTR_LOD to your object. Your framerate will only go down if you pick an LOD that is larger than the sim would have picked for you.
BEN article 2
This series of posts will discuss how the LOD system works for objects. Understanding LOD is very important for tuning the performance of custom scenery that uses either
-
very complex objects with lots of polygons, or
-
a very large number of objects.
Authors View vs. X-Plane’s View
A “level of detail” for an object is a complete representation of the model with complexity changed to fit a viewing distance. In other words, LODs are copies of your objects, some of which have been simplified so they will draw faster when far away.
Each LOD for an object contains a viewing range, indicating for which range it is appropriate to use this LOD.
An X-Plane object can have LOD information, via the ATTR_LOD attribute. If it does, it may have one or more “LODs” – that is, separate representations of the same object.
If an X-Plane object has no ATTR_LOD command, X-Plane turns the entire object into one LOD by automatically calculating the viewing range based on the size of the object. (I’ll discuss this in more detail in later posts.)
This last point is important because it means that, to X-Plane, every object has at least one LOD. If an LOD is not provided by the author, one is created!
Picking an LOD
When X-Plane draws an object, it measures roughly how far away it is and picks the LOD within the object to draw. This can save some frame-rate but isn’t a cure-all.
-
The cost of animation and attributes is based on the LOD drawn. So if you have an object with a lot of animation that is not visible a long way away, using a second, simpler LOD with no animation will help framerate because X-Plane won’t evaluate the animation when the complex LOD is not drawn.
-
The cost of moving the texture to the graphics card is incurred no matter what LOD is picked, so you don’t save on “working set” (that is, the effective amount of VRAM X-Plane needs) with LOD. If your object has a huge texture, you pay that cost any time it is drawn.
-
The cost of the number of triangles in the model is partly saved by using a simpler LOD, but it is partly global to the entire object. The problem is that all of the geometry coordinate data for objects is kept together in one giant glob. So when the tiny simple version of your model is being drawn, X-Plane may be shoveling the complex version to the card anyway.
This last point is important: making more LODs may actually increase the total amount of geometry data and make performance worse. Therefore while it may help a lot to have a second LOD that is much simpler, having 10 LODs, each slightly simpler than the last will probably hurt performance. Be sure to try your objects on a computer that doesn’t have a lot of free VRAM to see the effect of more LOD!
Don’t Draw That Object
While you can save some frame-rate by having X-Plane draw a simpler LOD, the true power of the LOD system happens when an object is so far away that none of the LODs apply. For example, if my object has 3 LODs from range 0-1000 meters, 1000-3000 meters, and 3000-6000 meters, then once the object is over 6 km away, X-Plane simply doesn’t draw it at all!
Not drawing an object is great for framerate. Not only do we save the time on the animations and attributes, but X-Plane never has to process the texture or geometry data, and that’s where the real framerate win comes from. Therefore the most important question for object LODs is “what is the maximum LOD” – that is, what is the farthest distance before X-Plane can stop drawing your object. X-Plane is pretty efficient at recognizing cases where objects, or even whole classes of objects, are simply too far away to draw.
(Consider the runway lights with the new “high detail world” setting…X-Plane places an object for every single runway/taxiway light, of which there are almost 10,000 at Chicago O’hare. But since the maximum LOD for these tiny objects is only 500m, X-Plane then eliminates the vast majority of the objects very early on and doesn’t bother to draw them, keeping framerate up.)
To draw a stupid analogy: the shorter the grocery list, the quicker your shopping. But if your grocery list has NO items and is totally EMPTY, you don’t even have to drive to the store, which really saves you time.
In the next part I will discuss world level of detail and maximum LOD distances.
BY TED:
XPlane2Blender v4.0.0-alpha.5, aka LODs
As always, make backups! This includes making backups before saving a 2.79 file in 2.80. There is no going back from that!
Override LODs feature and backwards compatibility
A quick LODs recap
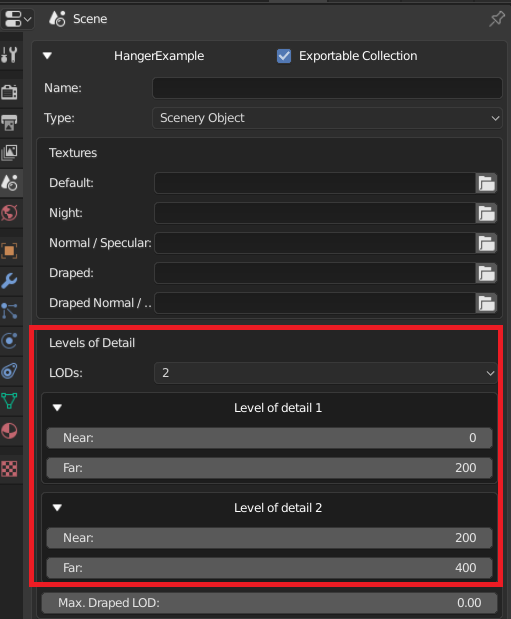
This release includes the last must-have feature for 2.80 – LODs. For those who haven’t used LODs before, it stands for (Levels of Detail). It is a way of defining what to draw when the camera is a certain distance away from an OBJ. In XPlane2Blender we call those ranges “buckets” and put Blender Objects (meshes, lights, armatures, empties) “inside them”. For instance, suppose an OBJ of a hanger with 2 defined ranges (buckets) 0 to 200 and 200 to 400. It has two meshes “HangerDetailed” (bucket 1) and “HangerLowPoly” (bucket 2). When the camera is close (0 to 199 meters), only the “HangerDetailed” mesh will be drawn. When it is far (200 to 399), only “HangerLowPoly” will be drawn. At 400 meters and above, nothing will be drawn. This is very useful for increasing the performance by not drawing what is too far away for the pilot to see. There are two styles of Level Of Detail: Additive (where every bucket starts at 0) and Selective (where the end of one bucket and start of the next are equal (see example above)). Use one or the other depending on what you need to draw when; don’t mix between them
LODs Mode in XPlane2Blender
Using LODs in XPlane2Blender is very easy: Define the ranges (buckets) in the OBJ settings, and tell Blender Objects which buckets they should go in. “LODs Mode” is considered On when you have specified a number of LOD buckets in the OBJ settings.
This means that:
-
LOD validations are on (see later section)
-
Objects must be placed into defined buckets or they will not be drawn. This is where the new “Override LODs” checkbox on Blender Objects comes into play.
[Picture]
The LODs feature works just like 2.79’s Layers Mode LODs, with a new time saving feature and some very small backwards compatibility notes.
Override LODs
-
In the Object Properties Tab of the Properties Editor, you’ll see a new “Override LODs” checkbox.
-
When checked, the familiar 4 LOD bucket choice checkboxes will appear.
-
Specify which buckets an Object will go into. All children below it will also go into the same buckets. Children who also override LODs will pass their new choices on instead.
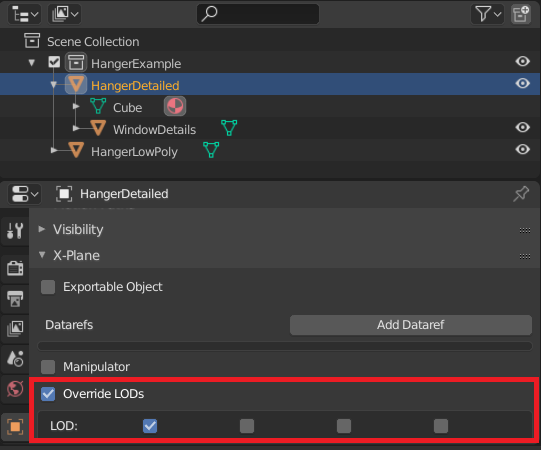
In this picture HangerDetailed has its “Override LODs” checkbox checked, and has been placed into bucket 1. Its child, WindowDetails, will automatically be placed into bucket 1 too.
An Object’s LOD choices will only be used if “Override LODs” is checked.
The idea is that just a few objects in the Blender Hierarchy will need to override the LOD choices, and old projects can be quickly reorganized to take advantage of this new feature. Inheritance will greatly reduce data entry.
Backwards Compatibility
There are only a few differences from 2.79 to be aware of