Detail Textures
NOTE
Detail Textures were previously referred to as “DECALS”. The term DECAL is a legacy term. The OBJ directives: DECAL_PARAMS and NORMAL_DECAL_PARAMS are part of the OBJ specification and will not change; however, the term “Detail Textures (DTs)” are the official name for these specific texture types. As of XP2B v4.3.3, the label “Decal” is used in the UI panels. Future versions of XP2B will adopt the label “Detail Texture” in lieu of “Decal”. Until such changes are integrated into XP2B, consider the terms interchangable in the meantime.
General
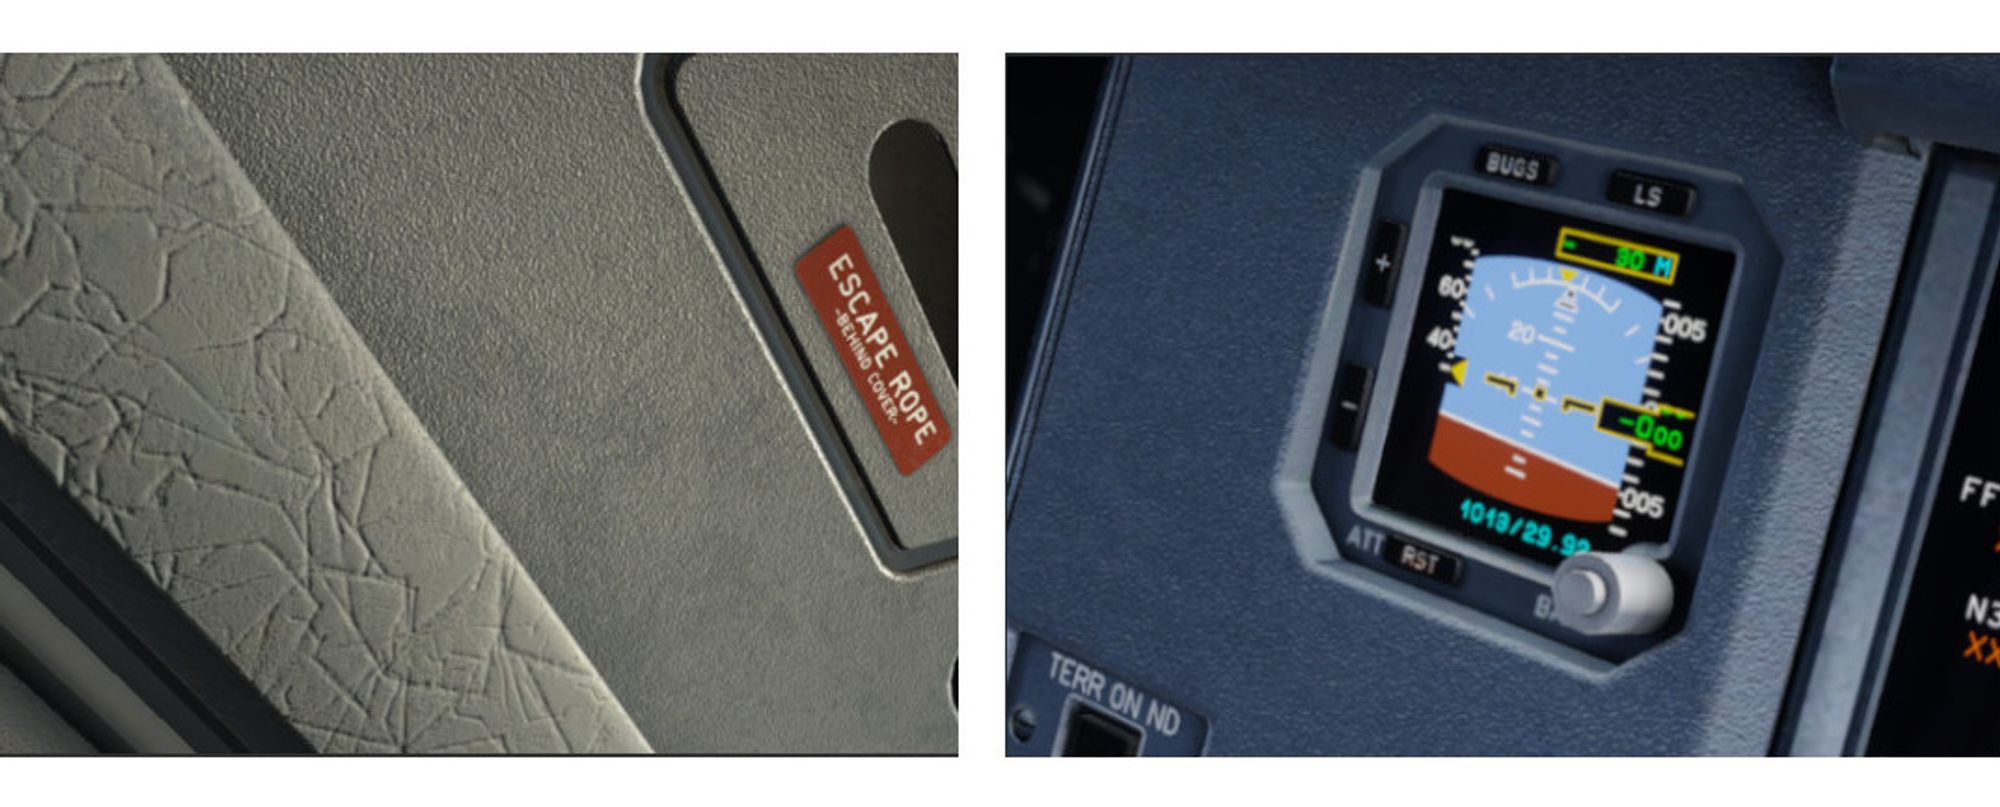
Detail textures were designed as a way to add high-resolution texture detail by tiling lower resolution textures over other base textures. The VRAM usage of two smaller textures is lower than one large texture to capture the same amount of texel resolution. Detail textures were originally designed to be used with ground textures, but have been extended to be utilized for aircraft as well. Detail textures are a suitable technique to represent broad areas of repeating textural detail. The screenshot below shows detail textures used to simulate hyde grain effects as well as molded plastic texture effects. (Click on image to enlarge)
Detail Texture Concepts
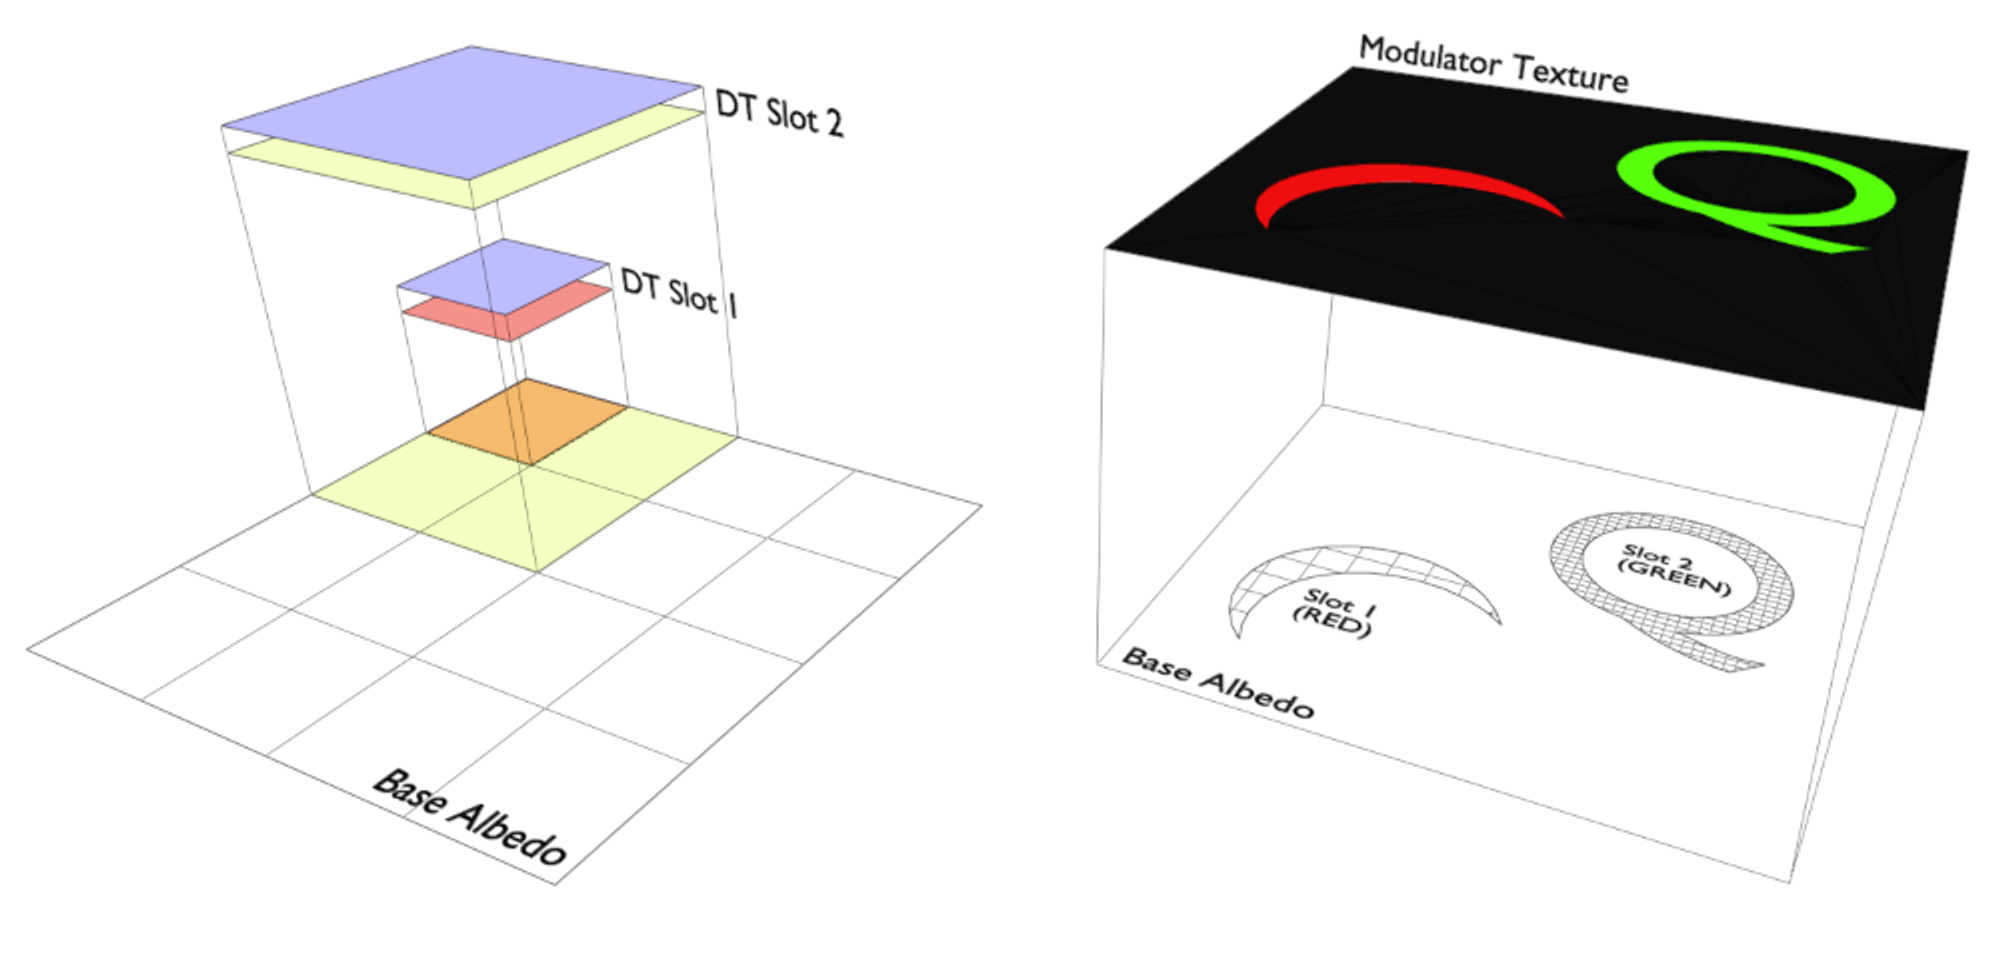
Refer to the image below:
-
An OBJ may have up to two DT Slots. Each slot may contain a ‘DT Albedo’ and a ‘DT Normal’ texture. Either DT in each slot may be used, one does not require the other. The example above only utilizes Normal DTs. The Albedo DT can have an alpha channel; however, the Normal DT ignores both the blue and alpha channels. Only the Red and Green channels of the Normal DT are utilized for normal/bump effects.
-
Each DT slot has its own scaling parameter. In the example below left, DT Slot 1 has a scale of 0.25 and DT Slot 2 has a scale of 0.5.
-
When using Albedo DTs, the color mixing with the Base Albedos is established by a graphics shader. There is no configurable ‘mixing mode’ such as “multiply / add / overlay”, and for Albedo DTs containing high saturation hues, the results can be unpredictable. Albedo DTs for aircraft use are best suited for adding lower saturation hues.
-
DTs are tiled orthogonally, there is no provision to rotate the tiled pattern.
-
An optional Red / Green channel Modulator Texture (MT) may be utilized as a mask, to control where DT1 and DT2 are applied to the Base Albedo texture.
-
A Base Albedo texture is required to use Albedo DTs and a Base Normal Texture is required to use Normal DTs.
XP2B Settings
NOTE
Detail Texture setting widgets are available in XP2B Version 4.3.3-beta-3 and later.
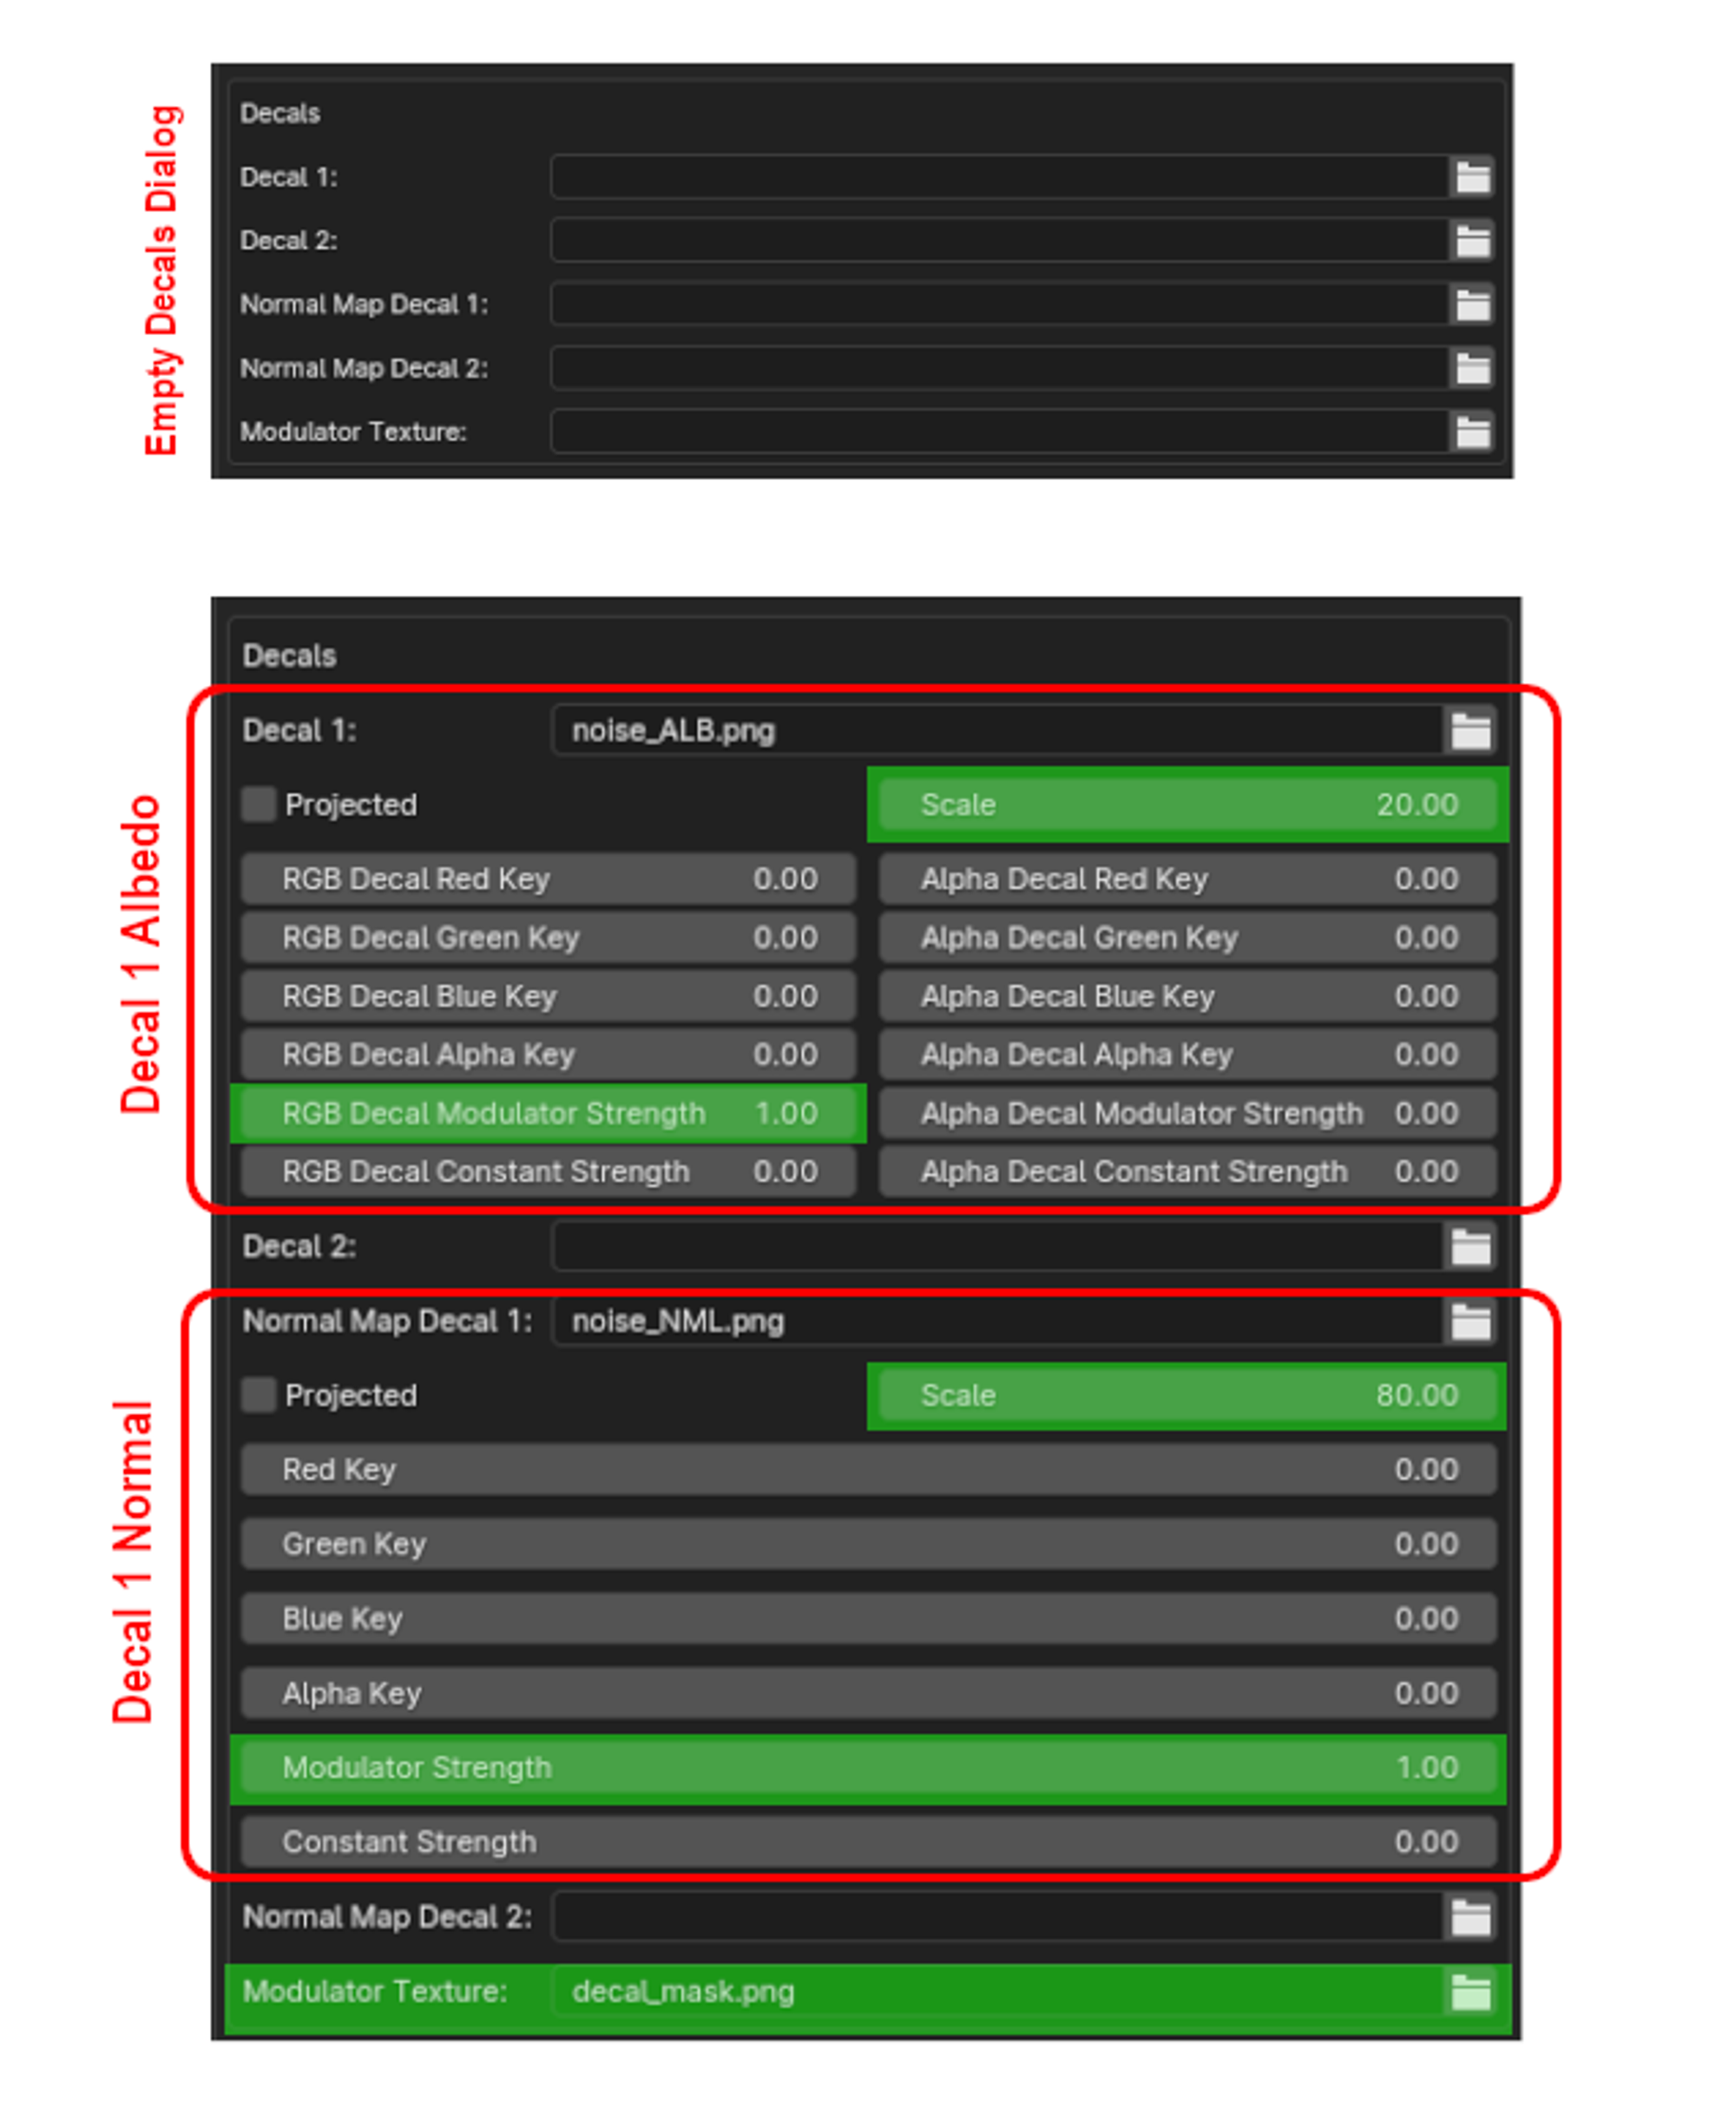
The XPlane2Blender settings for Detail Textures (DTs) are found on the Scene Properties Tab as shown below. Additional fields will appear once you enter the DT filenames. The image below shows the XP2B UI widgets for Albedo DT and one Normal DT. The good news is that for aircraft use, we do not need too many of these options. The highlighted areas in green are the only fields you need to be concerned with for aircraft use. The others fields are used for scenery development and ground texture DTs. Each field is as follows:
-
SCALE: The scale isn’t exactly a scale factor in the typical sense, but rather the “number of tiles” along the edge of the albedo, ergo it is the inverse of the scaling factor. In the example above left, the scale would be 4. This field should be a value ≥ 2. One tile makes no sense as you could just mix the textures together in Photoshop.
-
RGB Decal Modulator Strength: This is most easily described as a type of opacity or ‘strengh of effect’ value. A value of 1 mixes the DTs with the Base Albedo with full strength. Lower values reduce the effect of the DTs.
(Example further below). A value of zero effectively negates the DT effect. -
Modulator Strength: Same as above, but for the DT Normal Texture.
-
Modulator Texture: A Red/Green channel texture to use as a mask for DTs 1 and 2. The red channel of the Modulator Texture will control where DT1 is applied and the green channel controls where DT2 is applied. The Red and Green channels may be mixed to apply both DT1 and DT2 to the same area of the texture. If no Modulator Texture is specified, then the DTs will be applied uniformly over the entire Base Albedo.
Example
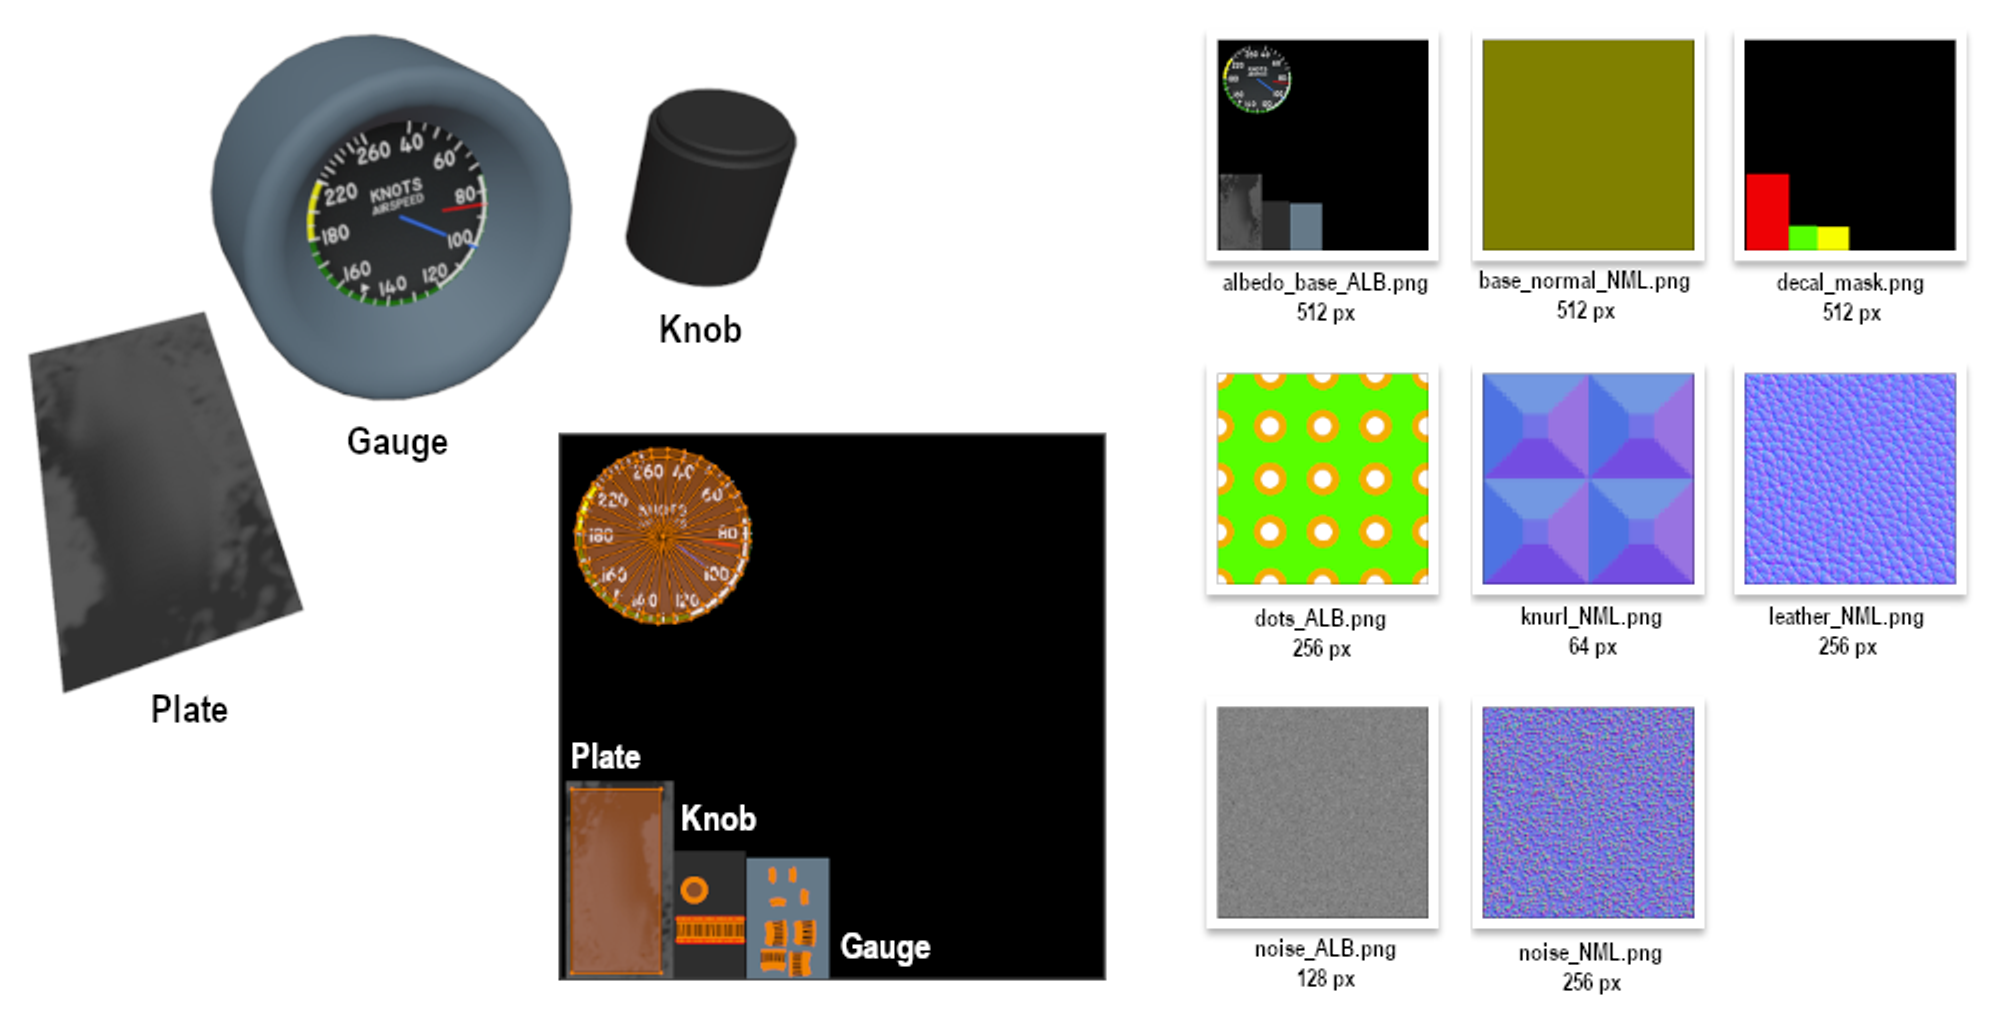
The best way to illustrate the use of Detail Textures are with examples. We are going to start simple and get progressively more complex. We will be using the following Objects and Textures below in our example. We have two Albedo DTs and 3 Normal DTs to work with, in addition to our Base Albedo and Normal textures.
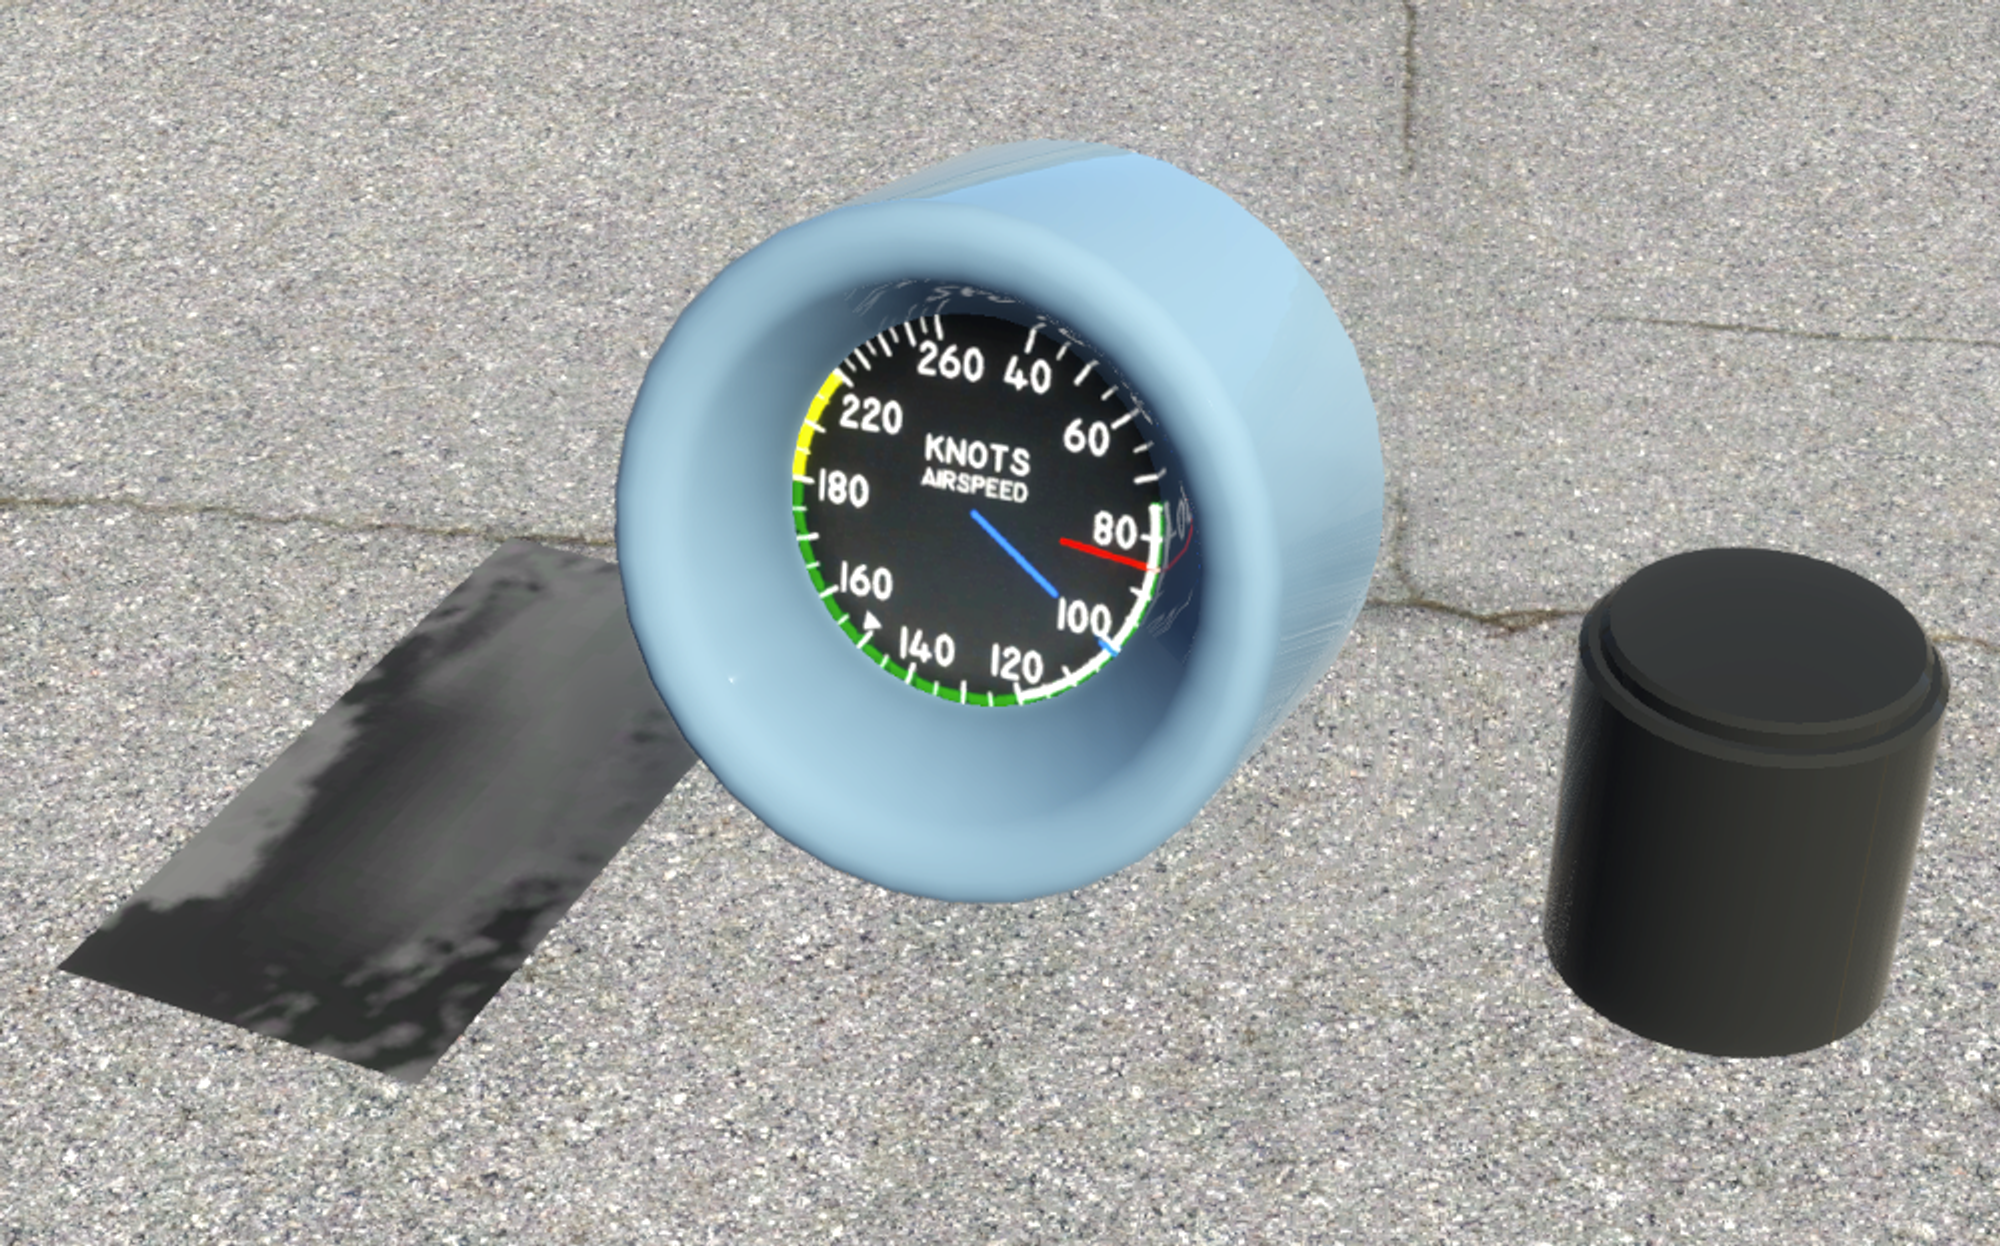
This is what it looks like in X-Plane without any Detail Textures applied, only the base Albedo:
Normal Detail Textures
We first begin with normal textures, because they are the most likely application with aircraft. We apply a Leather grain normal texture (256px) by specifying leather_NML.png as Detail Texture 1, setting the Modulator Strength to 1 and arbitrarily set the scale/tiles to 50. The results look like so.
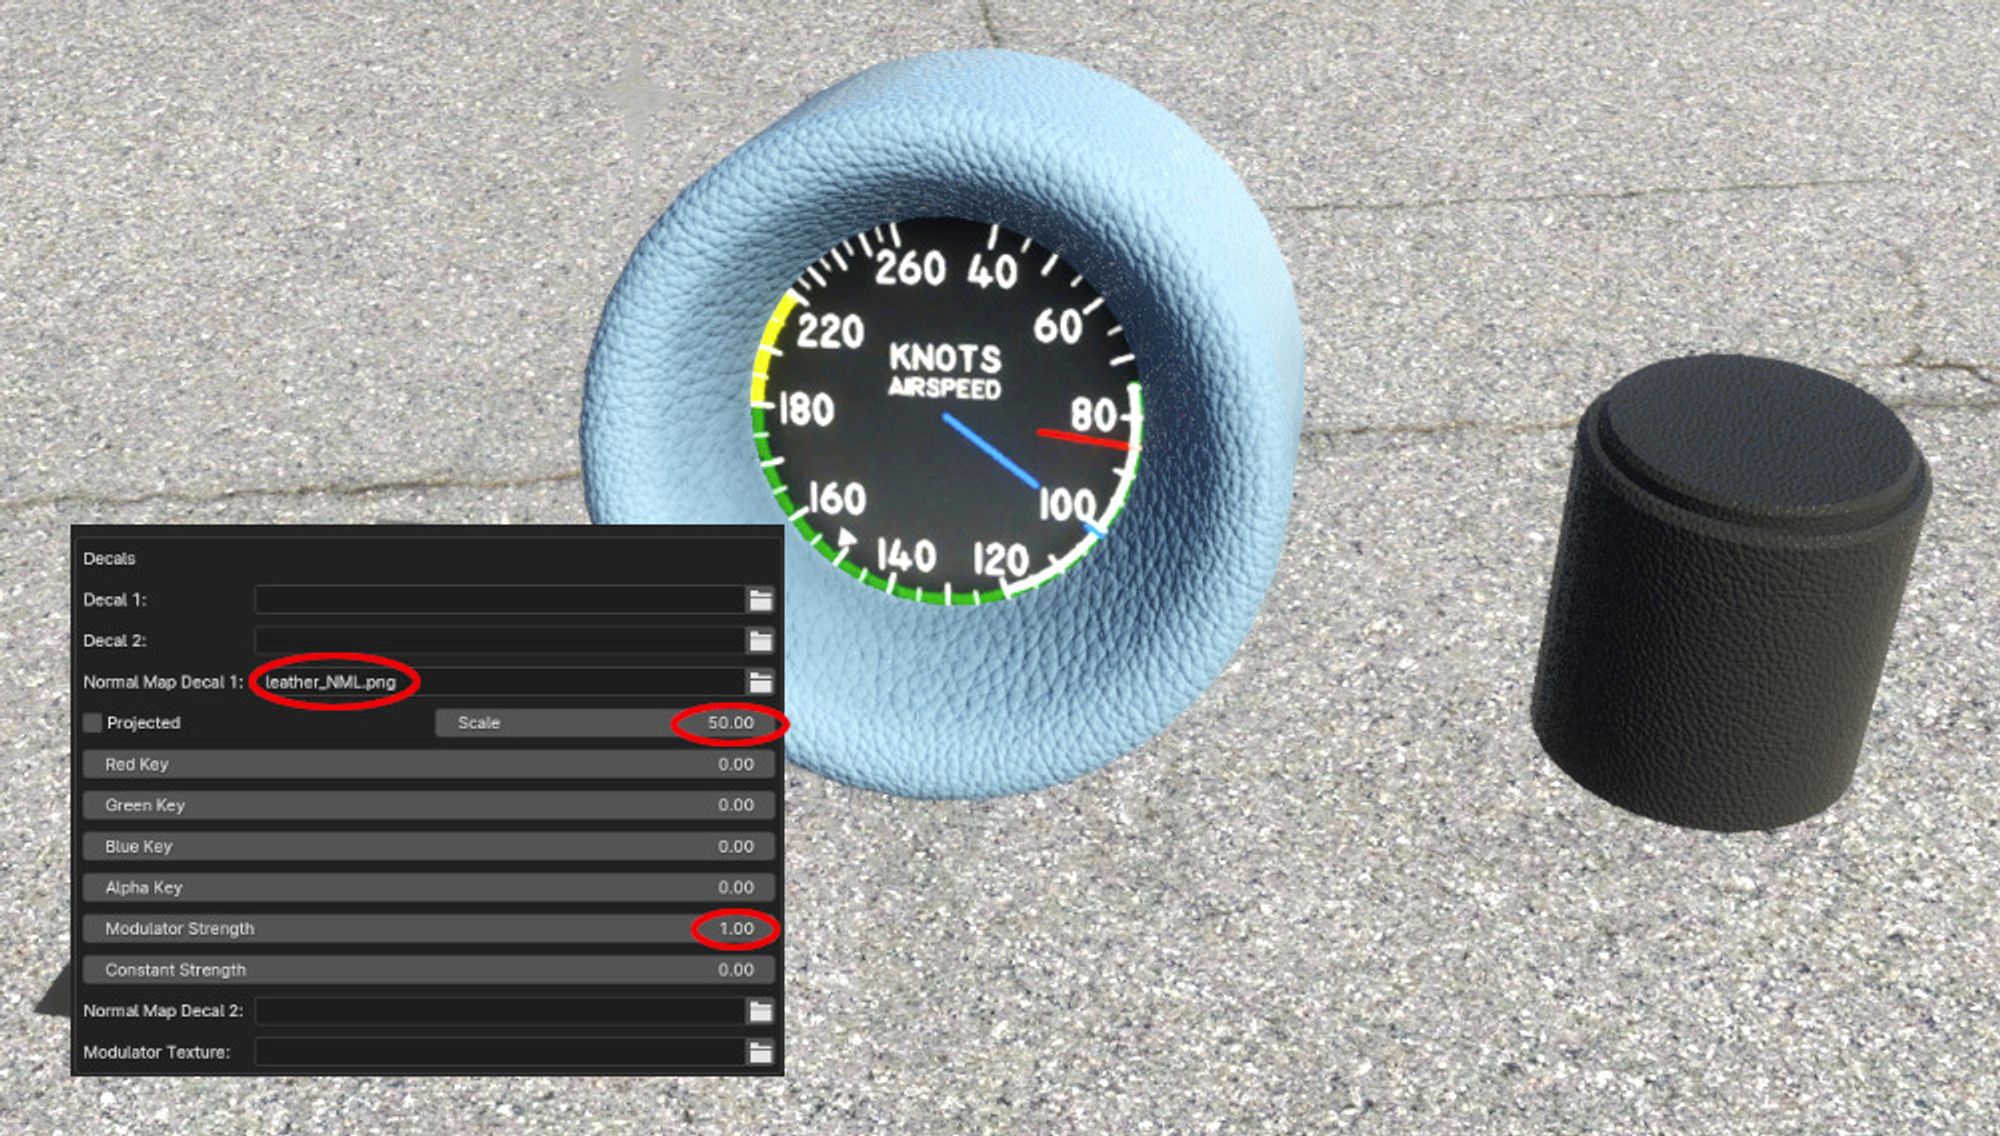
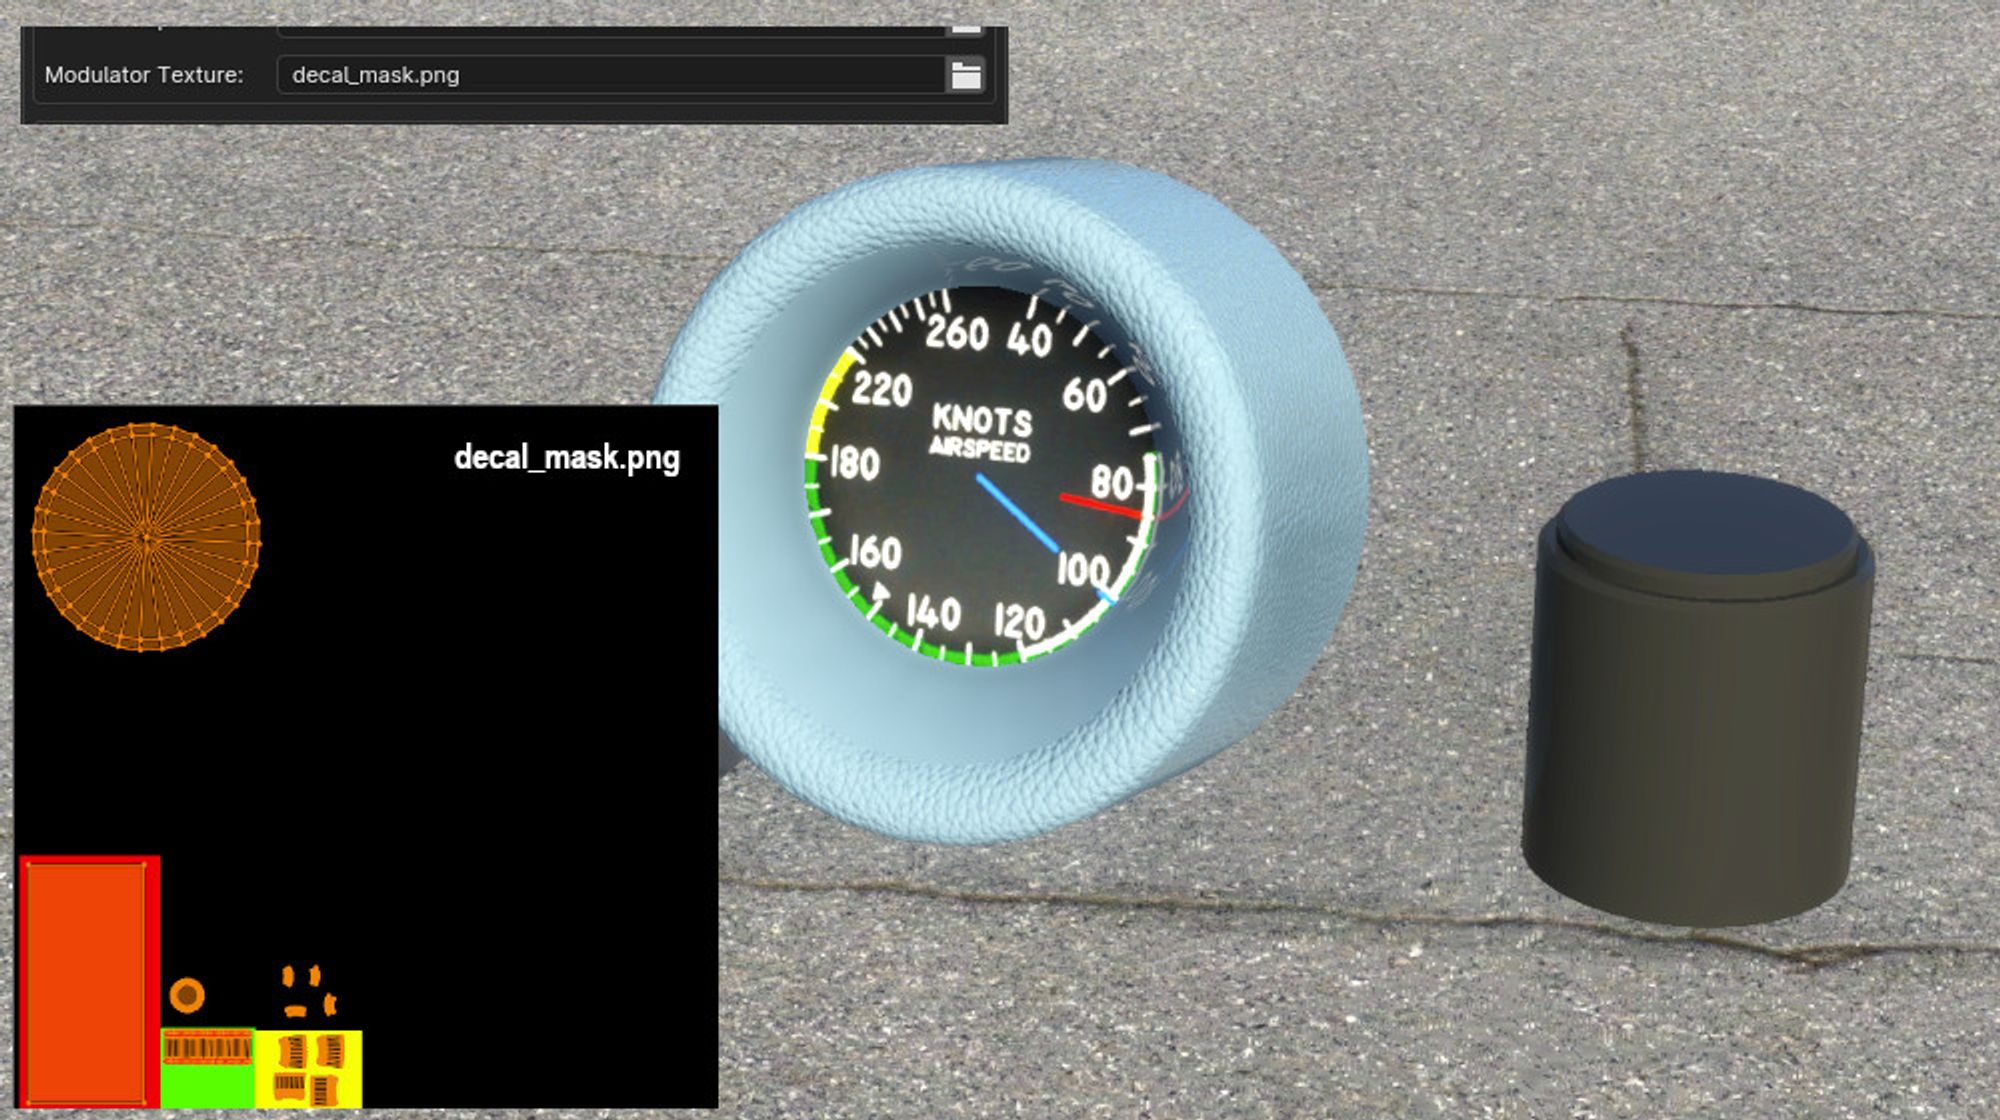
In the above image, note that the effect is applied over the entire OBJ, including the knob because no modulator texture was specified to mask areas of the texture. We will now specify a modulator texture to limit the leather grain effect to just the gauge surround using the RED channel, since this is a Slot 1 detail **texture.
In the image below, the settings are the same as above, except for the addition of the Modulator Texture, “decal_mask.png”. Some of the gauge surround now have DT Effects (yellow mask) and some areas have no DT effects (black areas of mask = no effects). Note that YELLOW is equal parts RED and GREEN so any UV islands mapped to yellow will receive both DT1 and DT2 effects; however, because no DT2 has been specified yet, only DT1 shows up on the gauge surround. Lets add a second Normal DT texture to add some noise on top of the leather grain.
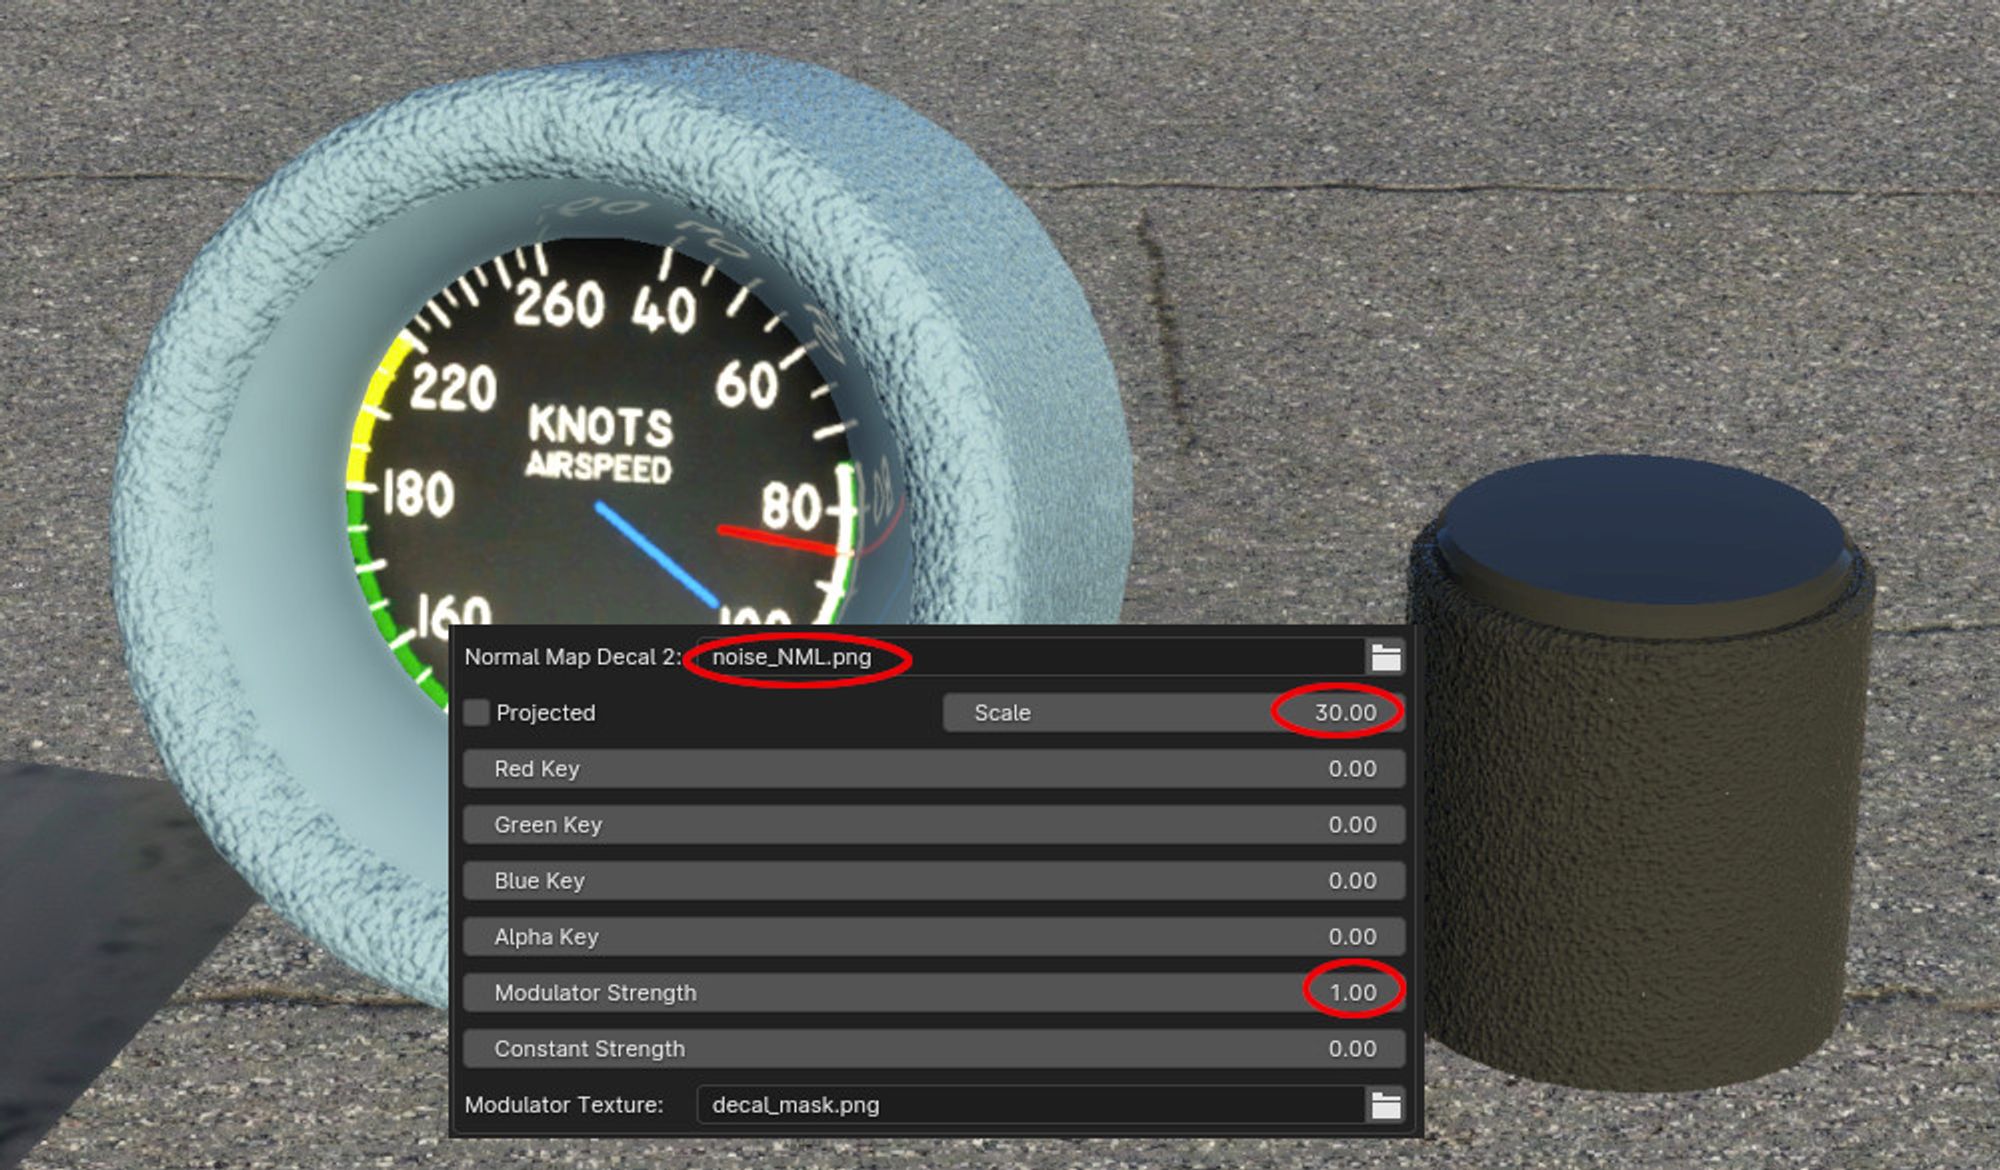
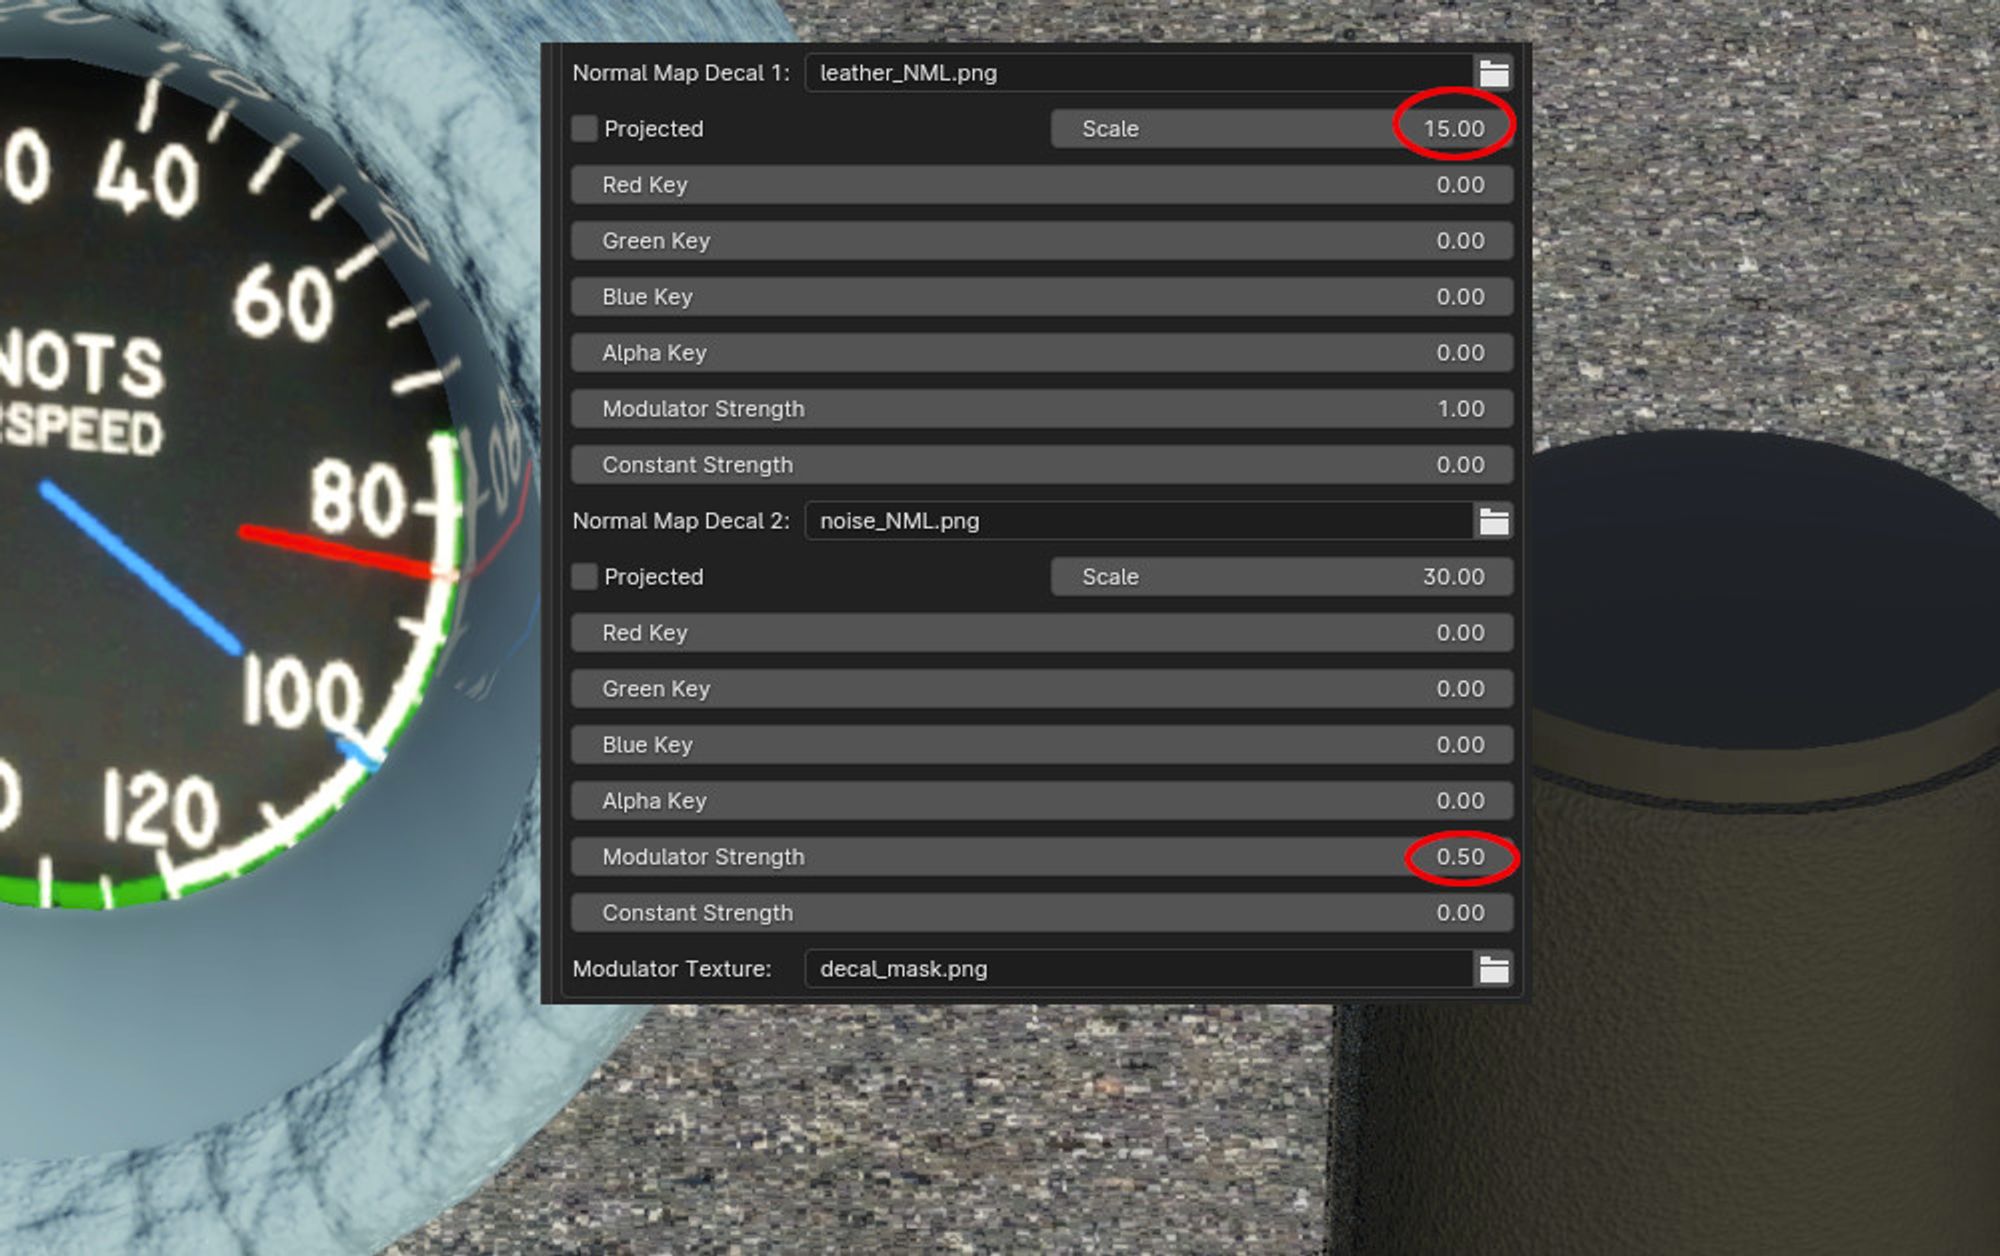
In the image below, we have added a second Normal Map Decal 2 with the 3 settings in XP2B circled in red. Because this is DT2, it is masked with the GREEN color channel. Since the knob UV is masked with GREEN, it receives the noise DT, but not the leather DT. The leather DT is indeed on the gauge surround, but it is overpowered by the noise DT effect. Lets reduce the Modulator Strength of the Noise DT a bit and scale up the leather DT slightly so we can see both effects on the gauge surround due to the YELLOW mask.
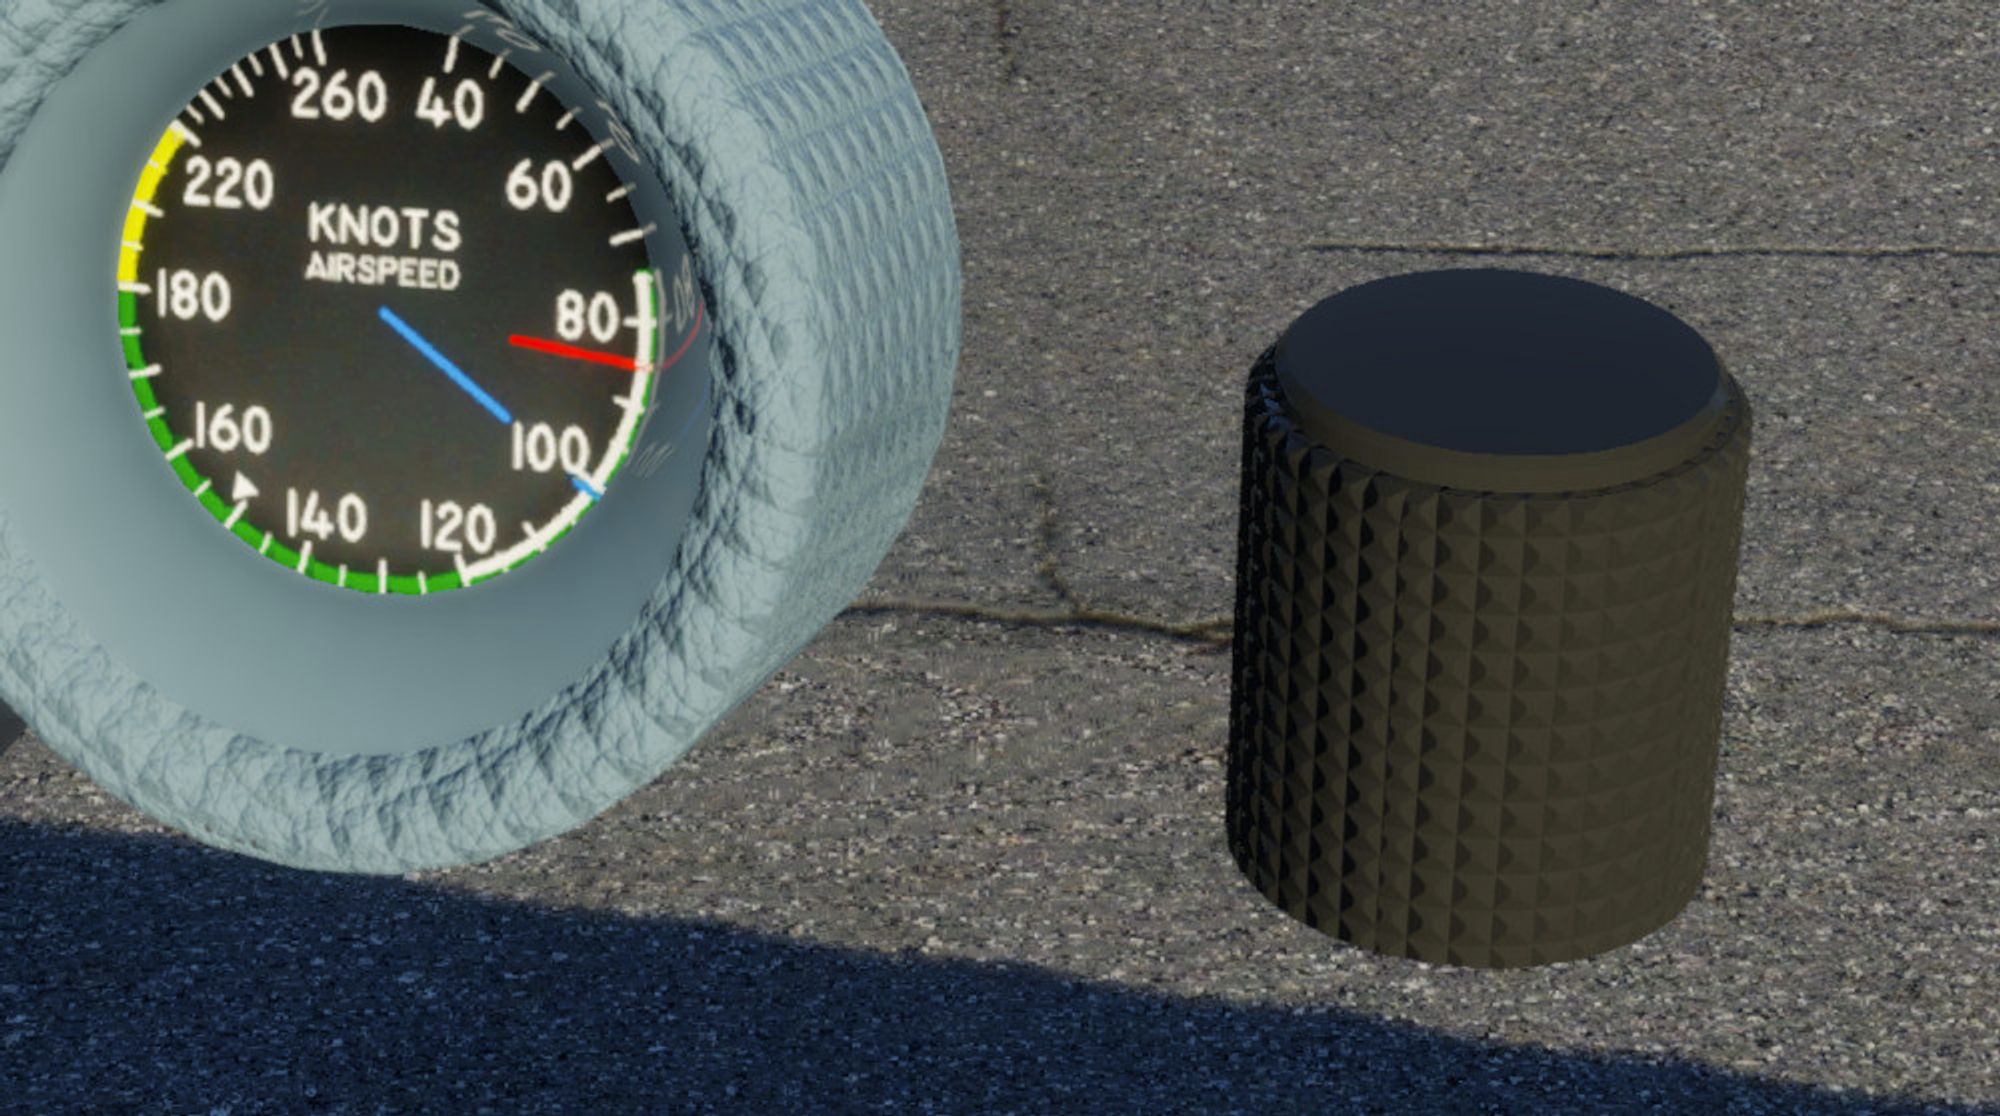
In the image below, you can see how the gauge surround now has both leather and noise normal effects. Also note how the modulator Strength reduces the effect of the Noise DT. Once you have specified your Normal DTs, simply adjust the Scale and Modulator Strength values to tweak the effect. Lets wrap up this section on Normal DTs with one last example. We’ll swap out the noise DT for the knurl_NML.png DT and set the Modulator Strength back to 1. The result is shown in the 2nd image below.
Albedo Detail Textures
Albedo textures are configured in the exact same way as the Normal DTs. Though there are more UI Widgets available for the Albedo DTs (for scenery textures), for aircraft you still only work with the same two input types as for Normal DTs, i.e. the Scale value and the RGB Decal Modulator Strength value.
As mentioned above, the color mixing of the Albedo DT with the Base Albedo is non-intuitive. The example below left shows a low-contrast noise_ALB.png added to the flat plate to add some grayscale noise color. The middle image shows the same flat plate, but with the noise Normal DT added in also. The right image shows a second, high contrast Albedo DT added, dots_ALB.png and illustrates how the color mixing of the Albedo DT with the Base Albedo yields a not so intuitive result that differs based on the pixels of the Base Albedo. (See original texture, dots_ALB.png texture above). Albedo DTs are best for applying more saturated, low-contrast colors, such as grime and dirt or to disrupt a bit of color uniformity.
OBJ GLOBAL Properties
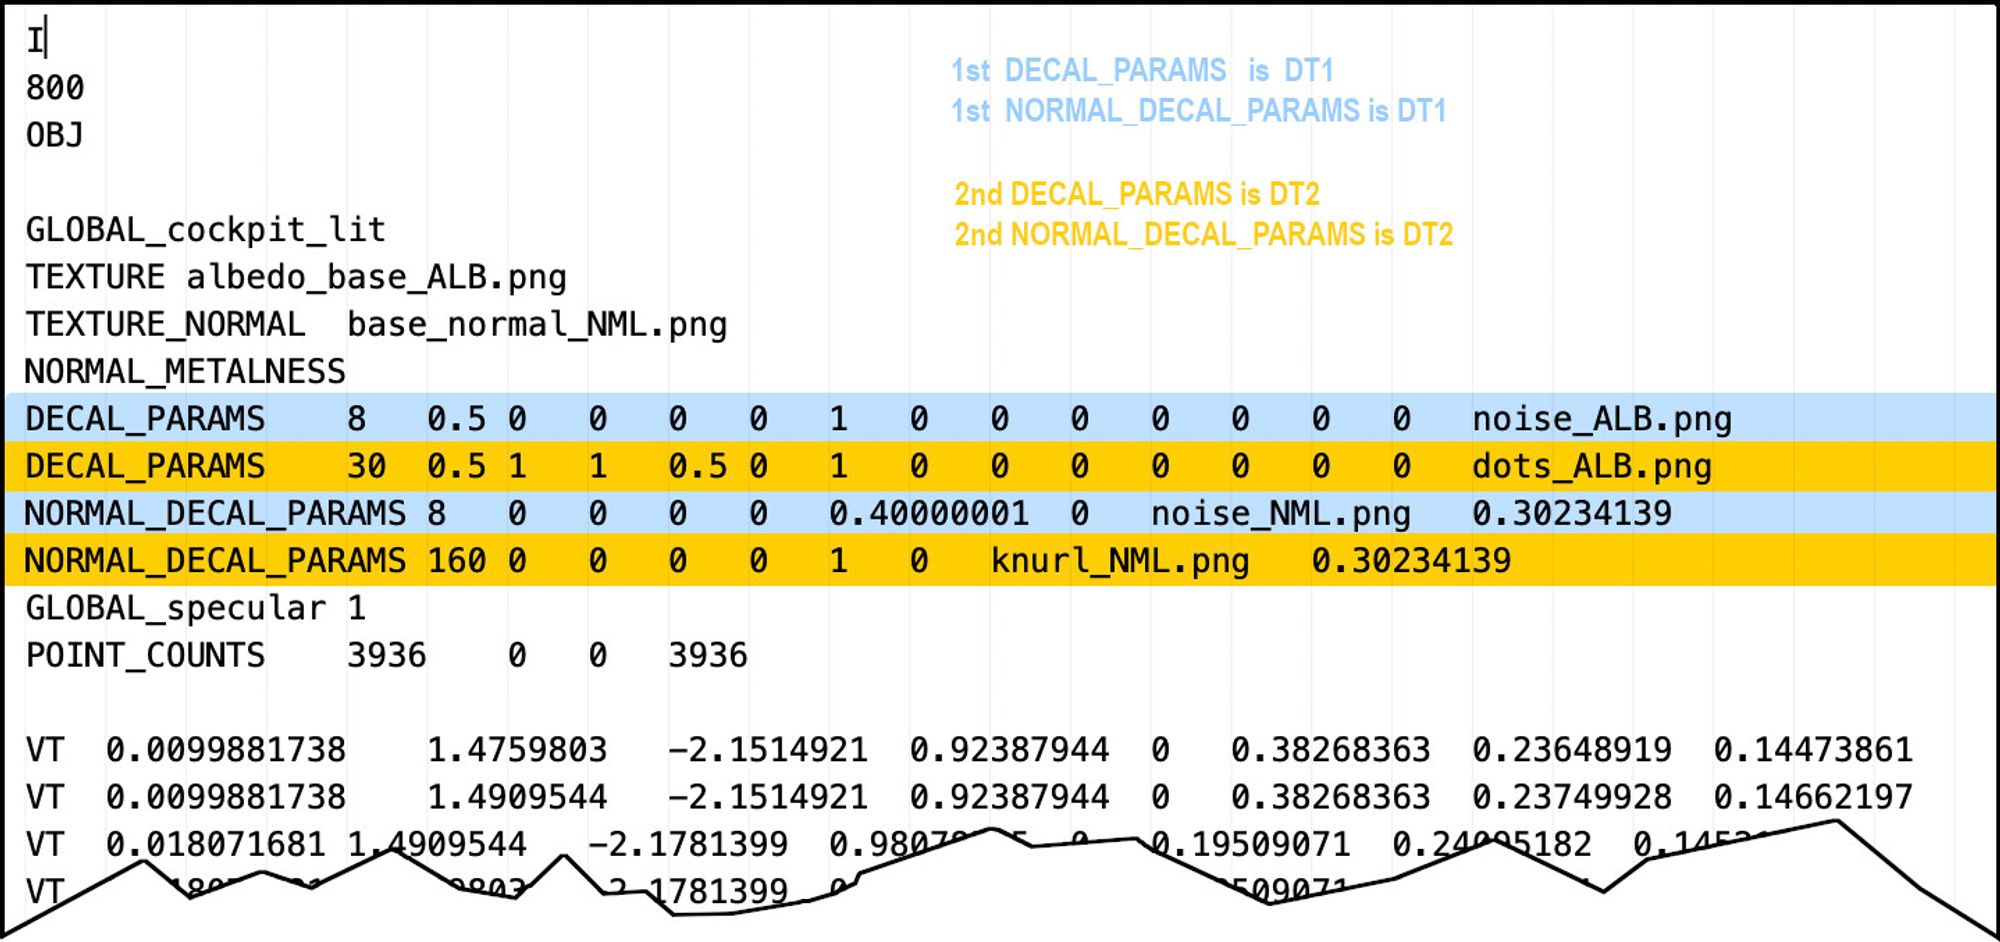
The image below shows the typical entries in the OBJ header for Detail Textures as XP2B exports the data. The order of the entries in the OBJ determines whether or not a Detail Texture is in Slot 1 or 2, and therefore, which will be affected by the RED and GREEN channels if a modulator texture is used. The XPlane2Blender UI references DTs 1 and 2, but this is semantic. If you specify DTs in XP2B in the DT2 slots, but leave the DT1 slots empty, then only one slot will be used in the OBJ and as such, any modulator ‘masking’ would be controlled by the RED channel. Best practice in XP2B is to simply use the DTs in order, i.e. DT1, then DT2 if required.
Summary Review
- Take advantage of why Detail Textures exist, i.e. save VRAM by using smaller textures where you are able. If you use a Detail Texture with a scale factor (tiling) of 1, there is no benefit.
- Keep texel densities the same for UV islands that use the same Detail Textures so the effect is consistent across all meshes using it.
- Use the Detail Texture Slots in the order they appear in XP2B, i.e. DT1, then DT2
- To recap, the Modulator Texture is for masking, the RED channel is the mask for Detail Texture 1 and the GREEN channel is the mask for Detail Texture 2.